Brianna Munson-Perez
Digital Media 2
Identity Collage

1. In as much detail as possible record the steps it took to create this project in photoshop. Use complete sentences.
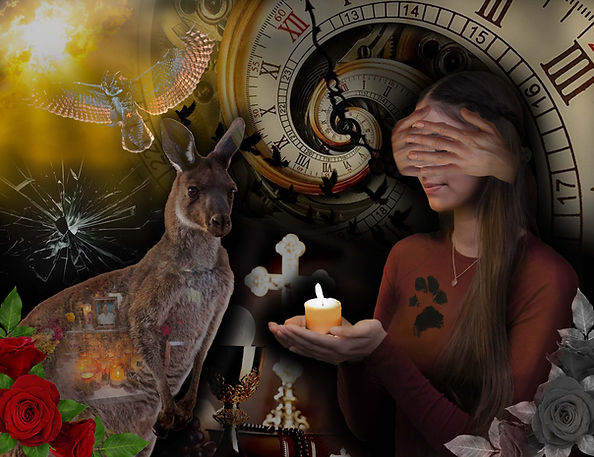
- The first step I took was to set up my document in photoshop. I created a New File > "Print"> Letter Size, making sure to rename the document. I then had to upload the portrait that I took with a partner and using the object selection tool and the layer mask button I removed the background of my portrait. Using the brush tool I concealed any remaining pieces. At this point I have added in images I found off of the internet that work well with the symbolism that I have incorporated. Similarly I used layer masks to remove backgrounds. Using adjustment layers such as Brightness/Contrast, Hue/Saturation, and Contrast I was able to blend the images together. Using contrast I had turned the contrast down so when I used the brush tool I was able to reveal the certain parts I wanted to be brighter. Especially on my portrait since the lighting is more directed to the left. Every adjustment layer I had used a clipping mask to attach it to the appropriate layer. I used blending modes such as darken and hard mix, located in the layers panel, so that I could create a more cohesive image.
2. Define the terms as they relate to Photoshop: Blend modes, layer masks and adjustment layers. Give a specific example of how you used each of these in your identity collage.
- Blend modes are used so layers can interact with one another without having to alter the original image. For example, I used the blend mode hard mix to combine the paw print and my portrait, allowing me to add the paw print onto my shirt with ease.
- Layer masks are used to enable you to reveal or conceal parts of your image in a non destructive manner. I used layer masks when removing the background of objects such as the candle, my portrait, and the hands covering my face.
- Adjustment layers are non destructive image adjustments that will allow you to make changes in things such as lighting and color that will sit above the original image. I used adjustment layers when adding a harsh lighting to my portrait. When implementing the candle I knew I wanted to add lots of contrast to my lighting, so to do this I used the exposure adjustment layer to create that effect.
3. How does your college represent your identity? What specific images did you use and what do they represent about you?
- My collage represents the result of my senior year. There have been a lot of things that have happened for me this year and I was able to represent that through symbolism. Some things I included were the paw print of my childhood dog that recently passed, the hands covering my face to represent blinded guidance (hence the candle). I added roses to symbolize the love I try to give out. The clock behind my head represents the constant battle of deadlines and representation of how little time I have as a kid left.
4. What was successful in your project? What was unsuccessful and what would you do differently next time to solve this problem?
- I think I was successfully able to incorporate meaning behind my collage that speaks true to my experiences. What I would do differently is focusing on the bigger portion of the collage first, meaning adding in a background first and working off of that. I believe that would have helped me to get my composition started.
5. Based on the learning target, what level of mastery does your project demonstrate (Exceeds, Meets, Needs Work, minimal understanding).
- Based on the learning target I believe I have reached a exceeding level of mastery because I am able to implement what I have learned from previous projects to create a combination that depicts my emotions and circumstances. I have reached this level of understanding because of the multitude of adjustment layers, blend modes, and especially layer masks used. These helped me to create a collage with a clear composition.